These watermelon sugar cookies are one of my kids’ FAVORITE treats to make! We whip up a batch every May, just in time for Memorial Day weekend. These watermelon cookies look difficult to make, but they aren’t. But, you don’t have to tell anyone.
My kids love to spend time baking in the kitchen. However, they usually pick something that takes us a LONG time (and typically quit meaning I’m left to finish the baking myself).
That is why I love these fun watermelon sugar cookies. They take no more than one hour (from mixing to chilling to eating). Plus, the process is broken up into smaller “sessions,” which can help keep the kids’ interest much longer.
You’ll start making your watermelon cookies with a package sugar cookie mix. Yep – you can use the bag from the store! Of course, if you have a recipe you love, you can certainly use that instead. But, if you are pressed for time or just want to simplify things, just stick with the bag.
Then, you will split the dough into thirds. Two thirds will be tinted pink and one-third green. You will work the dough until the color is blended.
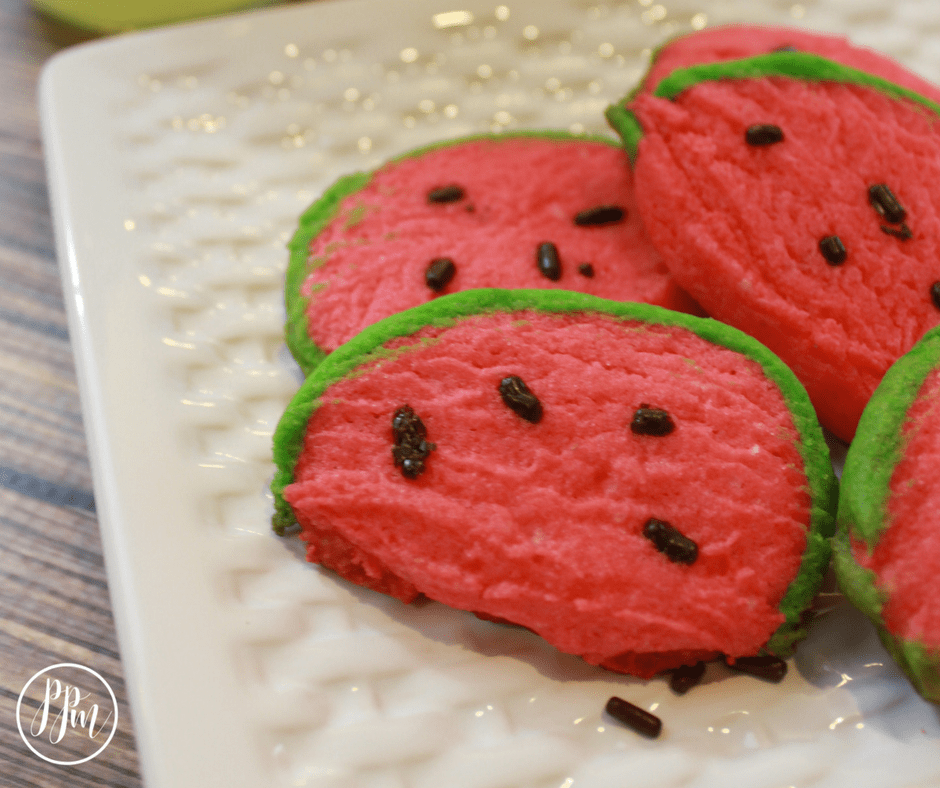
To get your watermelon rind, you will roll the green dough out onto a flat surface. Then, set it aside. Make a “tube” with the red center. Then, push down one side of the watermelon center, so it is flat on one side (the video will explain this too). Then, carefully add the green watermelon rind to the outside. Wrap and let it chill.
When it’s ready, you’ll cut your slice (I use unwaxed floss to get clean cuts). Add the brown sprinkles for your seeds and bake!
That’s all it takes to make these yummy watermelon sugar cookies. I think what I love most of all is that they don’t require any frosting! Anytime I can avoid icing sugar cookies it’s a win in my book!
Below you’ll find the entire recipe for your watermelon cookies. I’ve even included a fun video of my kids and me making them together in my kitchen. I’m sure you’ll love these as much as we do!
Other Recipes You May Like
PrintEasy Watermelon Sugar Cookies

- Prep Time: 1 hour
- Cook Time: 7 mins
- Total Time: 1 hour 7 mins
- Category: Dessert
Ingredients
- 1 bag of Betty Crocker Sugar Cookies
- 1/4 cup of oil
- 1 1/2 tsp water
- 1 egg
- Red Dye (gel or drops)
- Gren Dye (gel or drops)
- Chocolate sprinkles
- Wax paper
Instructions
- Mix cookie mix, oil, water and egg. Stir until well blended — it should have a crumbly consistency (if too dry, add a bit more water, if too wet, add a little bit of flour).
- Form dough into a log (around 6″ long). Cut off 1/3 and set it aside.
- Place 2/3 of the dough back into the bowl.
- Add in red dye and mix until blended.
- Take a sheet of wax paper and shape the dough into a 12″ roll — with one side flattened.
- Cover (making sure flat side is down).
- Next, take the remaining 1/3 of the dough and tint this green. Place this between two layer of wax paper. Roll this out into a 12×4″ rectangle (or oval).
- Refrigerate the dough for around 30 – 45 minutes.
- Preheat your over to 375.
- Now is the time to assemble your cookies.
Remove both items from the refrigerator. Remove the top layer of the wax paper from the green dough. - Next, remove the red dough from the wax paper and place it onto the green dough, flat side up.
- Mold the green dough up to the edge of the red dough. Remove the bottom sheet of wax paper and trim (and repair) as needed).
- Set the dough back up (flat side onto your counter).
- Use unwaxed dental floss and slice the dough into cookies around 1/4″ thick.
- Place them onto an ungreased cookie sheet (around 2″ apart).
- Once all cut, place the chocolate sprinkles onto the cookie – as these are your “seeds.”
- Bake at 375 for around 7 minutes.
- Move to a rack to cool completely before sharing with your kids!
You can check out our video on my kids and I making this one — so you can see exactly how the process works!
